Once the paper has been undergone
aqueous treatment, and has been
strengthened, we need to take care of paper repairs before we can sew them back together.

Let us look at the folios that make up a section. On the top right of this picture, we see that the folio has completely come apart. This is the outermost folio of a section, and is typically subject to the maximum abrasion. The next folio (bottom right) has also started to tear at the fold, and requires repair. Whereas, relatively, the two folios on the left side of the picture have not split at the fold, for they have been protected by the outer folios. In some cases, the paper between the stitching have weakened on the innermost folio as well. Each of these need to be repaired before the folios can be pressed and made ready for sewing.
We make paper repairs with
Japanese tissue, which is a thin, strong paper made from vegetable fibers. It has a high structural strength, archival properties and also has good wet strength as well. It is available in a range of gsm and come in various color shades. Selecting the right shade and tone of the paper to match the paper being repaired, will allow the tissue paper to blend into the paper and not show off a contrast.

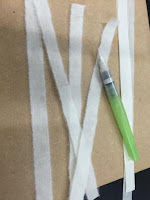
We need to prepare strips of Japanese tissue paper for repairing the folded parts of the folios. We make use of a water pen to tear off thin strips of the tissue paper with frayed edges. Tissue paper cut with a scalpel show off a sharp contrast on the folios, whereas frayed edges make the tissue blend in. A water pen is like a regular pen, filled with water allowing water to flow out in minuscule quantities through a hair brush. Use a scale to prepare narrow strips of tissue paper - Ready as many strips of tissue paper as required. Once the tissue paper is wet with the water brush, just tear it apart with your hand so that the edges are frayed.
Use paste with Japanese tissue paper. As the tissue paper is very thin, lay them on a piece of transparent plastic sheet and paste them out. The same may be picked with with a tweezer and pasted on the folios. Should the folio have completely split apart, you may paste two strips of Japanese tissue, one on each side of the paper.
With so many
folios to repair, it is more efficient to prepare a factory-like-setup. Cut
several thin strips of Japanese tissue, bondina (30 - 70 gsm) and also thin
strips of blotting paper. The sequence of layering the repaired folios is
as follows:
- Folio,
repaired with Japanese tissue paper
- Strip
of bondina…and so on

These layers allow the paste applied to the tissue paper to percolate
through the bondina and get absorbed in the blotting paper. Once dry, the layer
of bondina peels off the folios with paste, without sticking to it.

Where the folios have completely come apart at the fold, you may
consider reinforcing the joint with Japanese tissue on both sides of the fold.
This will thicken the folios at the spine, and will cause other problems later
on (increasing the swell on the spine), but we will deal with that at a later
stage.
It is important that there is a close color match between the color of the folios and the color of the Japanese paper, so that the repairs do not show.

Clip off the extra length of the Japanese tissue paper at the head and tail of the folios.

Any tear in the paper may also be fixed with Japanese tissue as shown. Where edges are frayed and are breaking apart, the Japanese tissue may be used to strengthen the entire edge.

Once the folios are dry, separate the folios from the Bondina and blotting paper, and fold them back, and assemble the sections. Take extra care to ensure that all the page numbers are intact and in the right place.
NOTE:
Rough guideline for thickness of Japanese tissue to be used: For
paper tears though the text, use 5 gsm, so that it does not obscure the text.
Paper tears on the edges may be repaired with 10 gsm or the like. Tears in the
fold, which require additional strengthening may be repaired with tissue which
are 18 gsm, 23 gsm, etc.


