Thursday, 10 December 2015

Paper Strengthening

We have seen how the process of float washing the paper can remove reduce levels of acidity from the paper, and makes it less brittle and reduces discoloration. But the paper is still weak, and remains easily subject to tear.

There are ways and means by which the paper can be strengthened. One such method is to apply a coat of Gelatin onto the paper, which improves the strength and stability of the paper.


Preparation of the paper

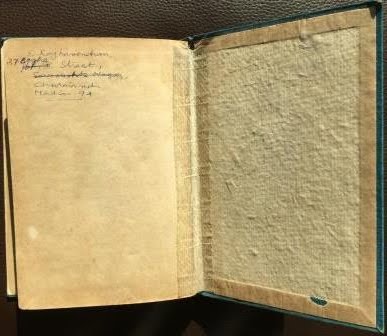
The starting point is the float washed paper that has been left to be air dried on archival blotting paper. Each folio is made up of 4 pages. Four such folios make up a section in this book.

NOTE: Notice how the inner folios (on the left) are intact, whereas the outer folios of the section are frayed or split at the fold. But we will deal with this repair comes later.


Prepare the Size

We prepare a gelatin size (Size is a thickened solution) using the following raw material:

G9391-100g Gelatin, from Bovine skin.
Type B Bioregeant powder
PCode 1001090276
Sourced from Sigma-Aldritch, St. Louis, USA

Take a liter of (warm to hot) water and mix about 50g(?) of Gelatin. Stir well until it becomes a clear solution.

Use a brush such as the one in the picture (A cheap distemper brush will do), about 3 - 4 inches wide, and very thin on the side. This will allow the brush to retain minimum amount of gelatin, and will apply a thin, uniform coat of gelatin on the paper. A thicker brush will retain a lot more fluid and will dump the gelatin  fluid on the paper.


Relax the Paper

To begin with, we need to relax the paper. A little bit of moisture in the paper immediately relaxes the paper. Spray a fine mist of water on the open folios on the blotting paper. A very fine mist is preferred. Notice how the paper curls up (along the grain direction) immediately on coming in contact with moisture!


Flip the folios carefully, and spray a fine mist of water on the other side as well. This will uncurl the paper and will relax the folios, so that it rests evenly on the blotting paper

Now you are ready to apply a coat of gelatin on the paper, to strengthen it.


Apply the Gelatin Coat

Dip the brush into the gelatin size, and drain the excess. Holding the paper, apply an even and thin coat on the paper. Once the entire surface of the paper has been covered with vertical brush-strokes, apply a coat with horizontal brush-strokes.


 Apply the gelatin coat on all the folios that require strengthening. Once the coat has been applied, flip the folios on the blotting paper, and apply the gelatin coat on the other side. Once done, let these folios air-dry.


The Result 

This is how the folios look after it has air dried. Even for the naked eye, the paper appears stronger and more stable.

Once dry, these folios will need to be re-assembled into sections that can be flattened out and resewn into a book block.


Trouble Shooting

When the paper has air dried, it should just lift off the blotting paper. But this one seems stuck! I find out that I have applied a 'very generous' coat of gelatin, and this means that the folios have gotten stuck to the blotting paper. In this case, all four folios are stuck!

What to do?

I am asked to apply a fine mist of water on the folios. As the paper absorbs moisture, the paper should get unstuck. That, at least, is the theory.

 But even after spraying water once or twice, the folios are not getting loose. I am forced to the step up my action. I cut the blotting paper into four separate parts, each with one folio. I float wash these sheets, interleaved with layers of bondina. Give it about 10 - 15 minutes.


The water soaks into the folios and the blotting paper, and lo! the papers now separate out easily enough. I gently lay out these wet folios to air dry on a new set of blotting sheets.

The papers have now been float washed and strengthened. But as we can see, many folios are still split at the spine, and would need to be rejoined, before the folios can be folded and resewn. But we are getting there... One step at a time!


Monday, 7 December 2015

Aqueous Treatment

Now that we have separated the book block, and disassembled the book into folios, we will proceed with aqueous treatment of the paper as part of the paper restoration process.

As this is printed paper, we can use water as the medium to float wash the paper. Should this be a work of art, or contain water based inks, a bath of ethanol is used to wash the same.

Aqueous treatment will achieve the following objectives:
  • Reduce acidity levels in the paper
  • Strengthen the paper, making it less brittle
  • Provide an opportunity to buffer the paper by adding using an alkaline solution
  • Undertake paper repairs, should any pages be torn
  • Reconstruct the spine
At the end of this process, we would have restored every folio to the extent possible, and be in a position to re-assemble the book.


Float Washing Trays


We will begin by float washing each folio - Yes, wash the paper in water!!!

We will use plastic trays such as this, for the purpose. Fill the tray with warm water (Tepid). Normal tap water in London is pH neutral (pH of 7), and is suitable for the purpose. Distilled water can also be used.

Fill the tray with about 2 inches of water; and we are ready to float wash the folios.


Alkaline Solution

While aqueous treatment with pH neutral water will remove a certain degree of acidity, it is desirable to treat the water with an slightly alkaline solution (pH between 7 & 8) - so that the paper is alkaline buffered, on the completion of aqueous treatment, which will enable it to counter-act the effects of further acidification and ageing. Various chemicals are used for this purpose, such as Calcium hydroxide, Magnesium Hydroxide, Calcium bi-carbonate and Magnesium bi-carbonate. Expert opinion on which is the ideal chemical for alkaline buffering is varied. It is enough to say here that a pH solution between 7 and 8 is desirable for normal treatment.

NOTE: Bondina is a thin layer of polyster material used in book conservation. It is porous, allows water and glue to pass through the sheet, does not react to water, and most importantly, does NOT stick to glue or paste. It is the ideal substance to be in contact with a surface that has been glued down, as it can be pressed, without any fear of the next layer sticking onto the glued surface. It is also used as a material through which a glued surface is boned down...


Prepare Folios for Float Washing


Place a layer of Bondina (30 - 50 gsm) on a flat and clean surface. Let the shiny side of Bondina touch the paper surface.

Place two folios from a section onto the layer of bondina. Spray a thin mist of water to relax the paper. The paper will start to curl up as soon as it absorbs moisture, along the grain direction!

Flip the folios, handling the wet folios with extreme care. Spray a thin mist of water on the other side as well. The curled folios will relax back onto the layer of bondina

Take the later of bondina, along with the folios and just lower it onto the water in the tray


Float Washing Paper


Repeat the process to build up to 6 - 8 layers of bondina, one on top of the other, in the tray. Since Bondina is a porous material, it will allow water to percolate into the layers, and will gradually wet the folios.


You can see that the ink is starting to run. This is bad practice. In reality, either the ink needs to be fixed with a spray, or with crystalline wax (pen), so that the ink does not run.

In this case, since this is more of a trial and learning for me, I push ahead regardless. Ssshhhh...

Place one more layer of Bondina on top of the top most layer.

Now, the set of bondina layers can be handled. Gently push the layers down, so that water can flow all around, and percolates through the layer of Bondina.

Allow it to soak for 10 - 15 minutes. This process of 'float washing' allows the acidity in the paper to be transferred to the water. Some level of acidity is removed, though not in its entirety.


Drying Racks

In the meantime, get a set of racks ready - such as the one shown on the picture, so as to allow the wet folios to dry.


Couple of more pictures that shows the construction of the drying rack... Loaded with springs, holding the racks in position.


Wait while Water Wets the Folio

Now, the water is seeping through the bondina, and the folios are fully soaked now. Dab the folios through the bondina, so that the papers get fully soaked, and the water moves around a little bit.


Replace the Water & Start Again

After about 10 - 15 minutes, we remove the sheets so that the water can be replaced.

Just hold all the layers together, lift it up, and let the water drain back into the tray. Remember that there are layers of bondina on both sides of the set of folios, and so, we are NOT directly handling the folios ever.

NOTE: Wet folios are extremely susceptible to tear, and hence should NOT be handled directly. A layer of wet bondina may be used to lift a wet folio, move it around, and released in a new position.


Let the water drain from the wet folios.......And put the wet folios aside on a table, for a few minutes.


Discard the Acidic water

Discard water. The water in the tray does not seem to be discolored at all, but when we pour the water into the sink, we can see that the color of the water is pale brown.

Replace the water with tepid tap water again, and repeat the cycle once more. Transfer the wet sheets of bondina interleaved with the wet folios back into the tray, with fresh water. Dab, and let the water seep in for about 10 - 15 minutes.

Now, it is ready to be taken out and to be left to air dry.


Prepare for Folios to Air Dry


Remove the layers of bondina and wet folios and place it on a table.

Keep a set of archival quality blotting papers, 100 gsm, ready on the table. Make sure that the blotting papers are reasonably clean, and do not have ink stains. The last thing that we want to do is to have a stain transfer from the blotting paper onto the wet folios!


Each layer of bondina, along with the folios can be lifted up and reversed onto the blotting paper. The surface tension of water ensures that the wet folios stick onto the layer of bondina, and it does not drop off.

Now the layer has been placed so that the wet folios are in touch with the blotting paper.


Now, gently peel off the layer of bondina, so that the wet folios are resting on the blotting paper only. Be very gentle in handling the wet folios.


Air Dry the Folios

Wet folios on blotting paper... Put one more blotting paper on top of the wet folios, so that it is drying from both sides.


Layer each set of wet folios (Float Washed) on one drying rack.


More wet folios may be placed on a blotting paper to manage space better, and manage with fewer drying racks!

After an hour, flip each set of blotting papers, so that the wet folios now lie on the other blotting paper. Remove the blotting paper on the top, which would now be wet, so that the wet folio is now exposed to the air.

Some papers cockle when it dries. This is fine, as we will be re-assembling the sections and pressing them in a nipping press shortly - That will flatten it out !!!

225 pages... And we work with one folio at a time (that's 4 pages)... Takes a lot of time.

And if we are to take care to test every single ink mark, to see if the ink runs, multiple the time required by a factor of two.


But book conservation and restoration is a study in patience. And that remains my toughest lesson yet!

In my next blog, we will see how we can improve the strength and stability of the paper further. Read all about it by clicking here...

Sunday, 6 December 2015

Disassembling a Book

We have completed making the assessment, and will now begin the process of restoration. The first step in restoration is to disassemble the book (take it apart) to the extent required.

Steps to Restoration

In the example that we have seen, the work required to restore the book is quite extensive. We will require to:

  • Disassemble the book, into its component parts: i.e. Separate the book block, cut the sewing, remove each section and separate the folios
  • Start with restoration of the Folios
  • Remove acidity from the paper, to the extent possible
  • Strengthen the paper
  • Mend any paper tears
  • Flatten the folios and assemble into sections
  • Sew the book back together again
  • Press the book block, and reduce the size of the swell
  • Mend the case, and prepare for binding
  • Bind the book.
  • Finishing the repairs

That's quite a lot of work! For someone like me who has no experience in book conservation whatsoever, I am feeling like 'Alice in Wonderland' right now.

Pause Before you Begin

One important question that we need to ask ourselves is this: Is it really worth the effort?

I mean, conservation is usually undertaken on valuable works, and typically, the basic quality of paper, binding, etc. is far better. Paper and books very much retain their look and feel even after 150 - 200 years. And this book that we have taken, is obviously a poor product for restoration.

If I were a professional, I would have to agree. But I am learning; And I know that this is the kind of book that we will deal with, in our organization, more often than not. What better example, then, to learn book restoration, than on this perfect specimen?

Let us see where the rabbit hole takes us...

Remove the Tapes


We begin the restoration process by removing the tapes. Since the glue on the tapes are very poor, it peels off very easily.

The difference between archival tapes and regular tapes is this: In archival tapes, the quality of the glue is such that it retains its stickiness even after a long time. In books that are hundreds of years old, it is possible to reactivate the glue just by moistening the spine!

In the case of poor tapes, hot glue, etc. the glue loses its stickiness very quickly. And in the case of hot glue, it starts to break apart as well.

NOTE: Most machine binding use hot glue!


Clean the Spine

Having taken the book block apart, we proceed to clean the spine.

We mount the book block on a finishing press, just to hold it in position, so that we can work on the book. Given that hot glue has been used, we clean the book mechanically. A blunt knife can be used to lift up scraps of paper and brittle hot glue sticking onto the spine.

If required, apply a thin layer of paste (just enough to moisten the spine), and use a blunt knife to remove unnecessary material and to clean the spine.


Looking much better now! A little more work should do it...

Before we take the book apart :Remember to

  • Number unnumbered pages
  • Make note where the photographs go back


Without this step, we can of course take the book apart, but will have trouble putting the book back together again!


We use a hook blade (on a scalpel) to cut the sewing threads, and to separate each section. Remove the remnants of the thread from each section.

That is the entire book, after it has been disassembled...
- End papers have come apart
-  16 sections
- 15 sections of 16 pages / 4 folios each, and the last section has only 8 pages / two folios.


Book Binding Tip: If it is necessary to have one section with a lesser number of pages / folios, it is better that it is the penultimate section, rather than the last one. The first and the last section are typically under the most stress, and it is best that these sections are thick and strong!


Starting to look neat, is it not?!?

Now, we are in a position to begin the process of paper restoration...

Read about paper restoration by clicking here


The Assessment

Making an assessment of the object of conservation is the first step in book restoration.

In this example, we are working on restoring a fairly recent book published in 1972, but the quality of the paper and binding is quite poor.

Let us take a look:

Observations

This is the first edition of the book, 'Voice Real' published by SRCM in India in 1972.


This book looks pretty nice on the outside. But let us turn the page.


We notice that:
- The quality of the paper is quite poor. It is acidic, and is turning the paper to yellow
- Paper appears brittle
- Stopgap repairs have been undertaken, by gluing a piece of paper to keep the book block attached to the spine


We can see that the paper is so brittle that it is breaking apart. 


The book has some photographs printed on art paper (Ceramic coated paper), and a tape has been used to keep it together


The color of the paper is turning yellow, which indicates that the paper is acidic. Acidic papers age very quickly and turns the paper brittle. 
The book is a tightback
Hot glue has been used to glue the spine to the cloth cover
The binding has come apart, and is in poor condition. 


Another view of how brittle the spine is. 


Some pages appear to be a lot further into the process of aging. We can see this from the difference in the color of the paper. 

Also, we can see that some of the pages (beginnings of chapters, etc.), do not have page numbers. It is important that all pages are numbered before we proceed. 


The book block is coming apart in the spine, all across the book. The issue is not only with the binding, but the book block as well. It is in poor shape indeed. 


Several pages have been underlined with pens and pencil. We are not sure at this stage if this has been done with an ink pen or with a ball pen.  

A soft ear bud (QTip) can be moistened with water and swabbed on the paper where the ink is present to see if the ink runs off. If it does, it indicates further processing is required to fix the ink on paper. If it does not, we can proceed with the next steps. 

This has to be done for every ink mark in the book. We cannot assume that the same pen would have been used to make all the ink marks. 

Pencil marks are not a problem, and do not pose any issues when processing the folios. 

In this case, we are still in the process of learning, and will proceed without further processing. 


Tapes used on the end paper towards the end of the book as well. 

In normal circumstances, annotations such as this are considered valuable and should be preserved, 


The book is coming apart at several points in the spine. The paper has turned brittle and the hot glue used has lost all its adhesion properties.


Some pages / sections are intact, and the sewing is still in position. 


There are multiple photographs that have been printed in art papers, and have been tipped onto the book block. 

Preparatory Steps for Restoration

Preparatory steps before beginning to work on the project include:
  • Numbering all pages, with a pencil
  • Identifying any missing pages / Folios
  • Determining how many pages / folios make up each section
  • Assessing the type of binding (Hollow / Tightback), Type of sewing, end bands (Present or absent), Type of material used for binding (Paper, Calico), Type of glue, presence and numbers of photographic plates, etc. 
  • If photographs are present, note down the position where they are inserted


Determine the nature of repair to be carried out. In all cases, the choice is always one of the degree of effort, which directly implies the balance between time / cost on on hand, and the extent of restoration. The basis for this determination is always the value of the book, and how much effort needs to be invested to restore the book. 

Having made the assessment, we will proceed to disassemble the book and begin the restoration process. Continue the journey by clicking here...